Looking to get started with a physical yoga practice? This handy guide breaks down five of the most widely practiced poses—also known as asanas—familiarizing you with both the English and Sanskrit names, as well as giving you step-by-step instructions on how to find alignment with each posture as you journey through your personal practice.
Pose: Child’s pose
Sanskrit name: Balasana
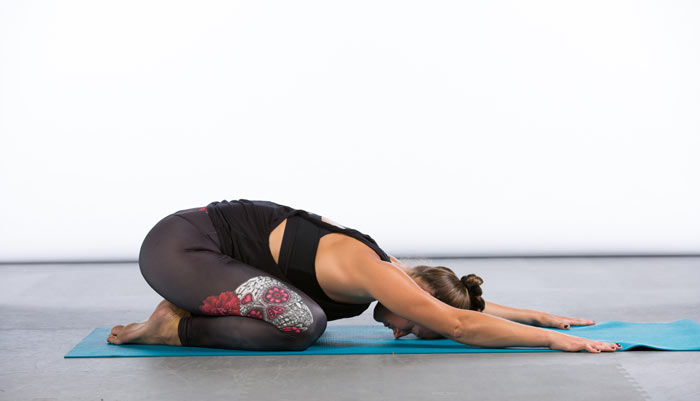
Introductory how-to: Begin in a hands-and-knees position with wrists below the shoulders and knees below the hips. As you inhale, part the knees out slightly wider toward the edges of your mat, connecting your big toes to touch. As you exhale, release the torso between the thighs, sitting the hips back toward the heels, continuing to outstretch the arms toward the top edge of your mat. If accessible, rest your forehead on the floor while keeping a neutral spine. Maintain this position, breathing comfortably for three to five complete breath cycles.
Pose: Downward facing dog
Sanskrit name: Adho mukha svanasana
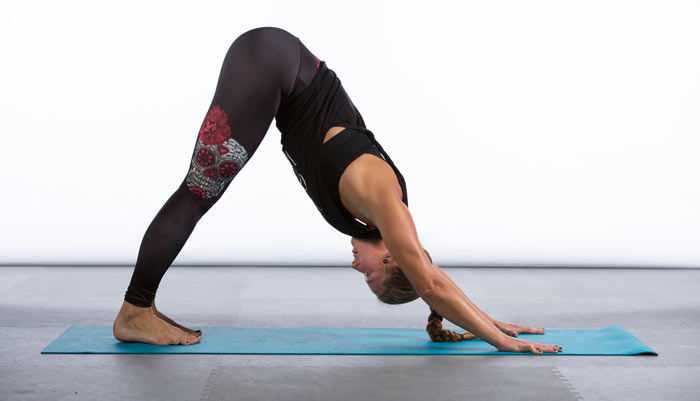
Introductory how-to: Begin in a hands-and-knees position with the knees directly below the hips and the hands positioned slightly forward of the shoulders. As you inhale, spread the fingers wide, rooting both palms firmly into the mat while simultaneously tucking the toes under. As you exhale, begin to extend the legs, drawing the hips and tailbone toward the ceiling, creating an inverted V-shape with the body as the heels move toward the floor. The head and neck should be positioned between the upper arms and the feet should remain hip-width distance apart. Focus on maintaining length in the spine in this pose, releasing the shoulders away from the ears and keeping the knees as softly or deeply bent as needed, while continuing to root firmly and equally through both hands and feet. Maintain this position, breathing comfortably for three to five complete breath cycles.
Pose: Upward facing dog
Sanskrit name: Urdhva mukha svansana
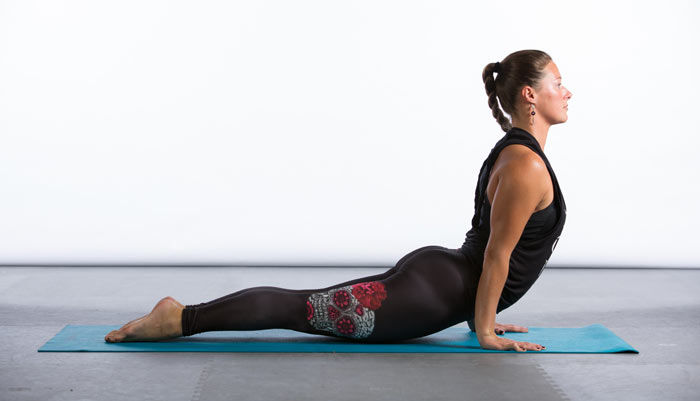
Introductory how-to: Lie on your stomach with legs fully extended along the mat, with the tops of your feet on the floor. Place the palms on the floor directly below your shoulders, keeping the elbows bent. As you inhale, press your palms into the mat, extending the arms while simultaneously lifting the torso and thighs off the floor. Allow the hips to soften slightly toward the mat while at the same time lifting through the sternum; soften the shoulders away from the ears and maintain neutral alignment in the neck. If accessible, look upward only with the eyes. Maintain this position, breathing comfortably for three to five complete breath cycles.
Pose: Warrior II
Sanskrit name: Virabhadrasana II
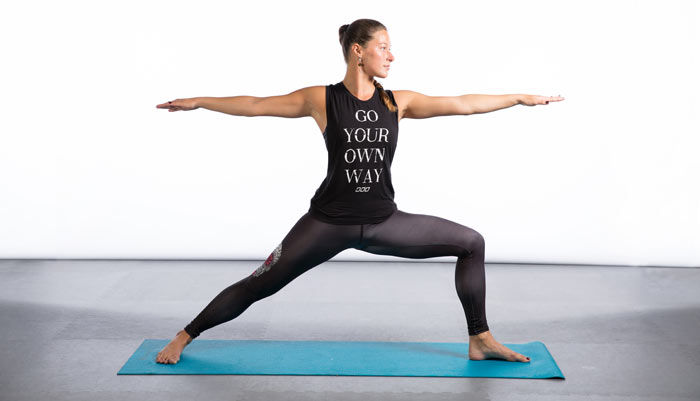
Introductory how-to: Begin standing with feet together near the front edge of your mat. As you exhale, step the left foot back approximately 3 to 4 feet, turning the left foot out at slightly less than 90 degrees so that the left toes and torso face the left edge of the mat, with the right toes pointed forward to the front edge of the mat. The heel of the right foot should now align with the arch of the back left foot. Slowly begin to bend the right knee, aligning the right knee with the second toe of the right foot, as the thigh draws parallel with the floor. Continuing to root firmly into the mat with both feet, outstretch the arms to reach in opposition toward the front and back edges of the mat with palms facing the floor. Keep the shoulders stacked over the hips as you gently turn your head toward the front edge of your mat, gazing softly over the right fingertips. Maintain this position, breathing comfortably for three to five complete breath cycles. Return to the starting position near the top of your mat, and repeat on the opposite side.
Pose: Tree pose
Sanskrit name: Vrksasana
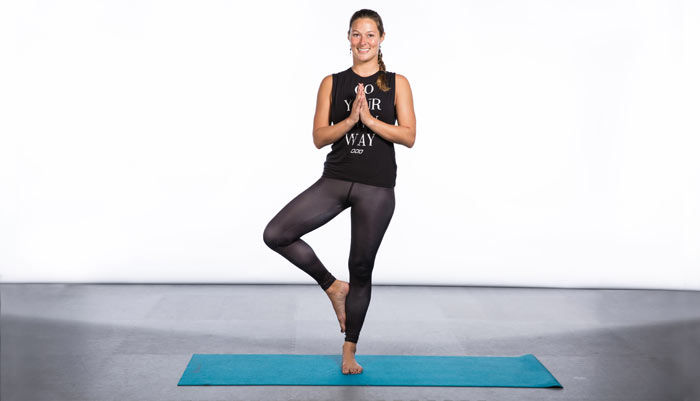
Introductory how-to: Stand with feet together near the front edge of your mat, with the hands lightly positioned on the hips. Slowly shift your weight into the right foot, rooting down firmly as you peel the left heel off the mat, opening the left knee toward the left edge of the mat, with toes remaining on floor. With control, draw the sole of the left foot to gently rest against the inside portion of the right lower leg, with toes pointing toward the floor as you balance fully on the right leg. Avoid pushing the right hip toward the right edge of the mat; instead, keep the center of the pelvis directly over the right foot. If accessible, join palms together in front of your chest or outstretch your arms overhead, with your wrists aligned above the shoulders. Maintain this position, softly gazing at a fixed point in the room as you breathe comfortably for three to five complete breath cycles. Release the left foot to your mat, returning to the starting position briefly before repeating on the opposite side.


 by
by 


 by
by