By Pete McCall, M.S.
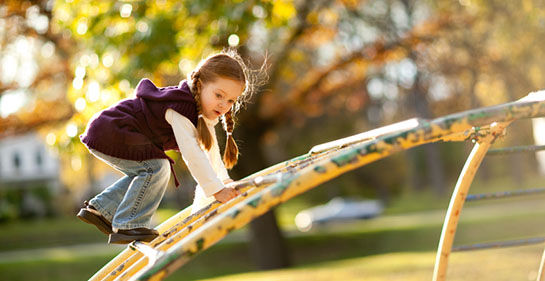
Picture a young girl of about three or four years old and imagine that she is set free on a playground. What would you see? A little girl at play would undoubtedly be a bundle of energy, climbing, jumping, running and moving in all directions at various speeds. Now picture an older woman in her seventies trying to navigate a busy urban sidewalk. How would an older woman move differently than a young girl? Being wary of having to navigate around other walkers and distractions in her path, the older woman will probably move slowly and cautiously, and with a limited range of motion, especially when compared to the young girl. If they have the same basic structure and anatomy, why would the two move so differently? The answer comes down to the myofascial network and its ability to control forces moving through the body in all velocities and directions.
Part one of this article series demonstrated how different fields of study are converging to describe the muscular system as a body-wide system of myofascial connective tissue. The key take-away from part one is to understand that the entire body operates as a single unit responsible for controlling the forces of compression and tension. Applying the tensegrity model of architectural structures to the human body demonstrates that when forces are introduced at one point in a structure, they are simultaneously transmitted to other parts of the same structure. During most exercises when a client is lifting a weight, it's not just the immediate muscles that are involved; rather, a wide network of different muscles will contribute and share in the force production.
Machines designed for muscle or joint isolation do not adequately involve the surrounding fascia and allow it to function as part of an integrated network to produce and control force. Machines are designed primarily to isolate and focus force into specific muscles for the purpose of developing muscle hypertrophy, more commonly referred to as tone or definition. Where most fixed-path-of-motion machines fall short is that they do not involve the entire myofascial network, which could lead to muscle imbalances that ultimately impede movement efficiency.
The second part of this article series demonstrates how to apply the theory of the myofascial network as one integrated system to design exercises that can help clients improve their movement efficiency. Movement efficiency is defined as an integrated balance between the central nervous system responsible for sensory reception and the motor or muscular system that identifies the appropriate motor response for movement (American Council on Exercise, 2010). Movement efficiency requires exercise strategies that first restore balance to the structural framework of the body before increasing the force production capabilities of the muscular system. The ACE Integrated Fitness Training® (ACE IFT®) Model was designed to provide personal trainers with a specific methodology for creating exercise programs that can improve movement efficiency by enhancing the function of a client’s entire myofascial system.
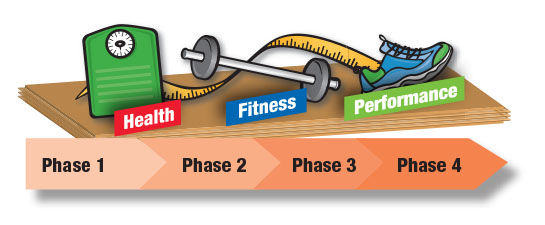
The purpose of the first stage of the functional movement and resistance training component of the ACE IFT Model, Stability and Mobility, is to improve the stability of the stable joints of the foot, knee, lumbar spine and scapulothoracic joint, while concurrently enhancing the mobility of the mobile joints of the ankle, hip, thoracic spine and glenohumeral joints. Improving the stability-mobility relationship within the human structure is critical for helping clients receive the greatest benefits from the second phase of the ACE IFT Model, Movement Training, which is designed to integrate stability and mobility to create mobile-stability or stable-mobility to improve movement efficiency.
Training Movement
The five fundamental patterns of human movement are:
- Squat – or any movement involving a bilateral bend-and-lift pattern in the lower body
- Lunge – or any single-leg movement pattern
- Push – either overhead or moving away from the front of the body
- Pull – either overhead or being brought closer to the body from the front
- Rotation – which can occur when the thoracic spine and pelvis are counter-rotating against one another
Performing movement-based exercises during the Movement Training phase can improve a client’s ability to use his or her fascial structures to store elastic, mechanical energy during the lengthening phase of muscle action to more efficiently produce energy during the shortening phase of muscle actions in these five patterns. Known as the stretch-shorten cycle (SSC), one of the more effective ways to enhance a client’s movement skill is to minimize the transition time from muscle lengthening to shortening in a particular movement (Siff and Verkhoshansky, 2009). This involves training techniques to have the human body moving upright on the ground to properly engage and use the forces of gravity (a top-down force) and ground-reaction (a bottom-up force).
In the previous example of the young girl at play and an older woman walking down the street, the primary difference in their ability to move is the elasticity of their respective myofascial systems. A young child at play is constantly moving in all directions and at different speeds; as a result, the myofascial system adapts to frequently changing levels of force and lines of pull allows for optimal movement efficiency. During the aging process, if an individual does not maintain multiplanar movement at varying rates of speed, the fascial structures will lose the ability to efficiently store and release mechanical energy. As muscles lose elasticity, they will lose both sensory input and motor output, which can greatly reduce or limit an individual’s movement efficiency.
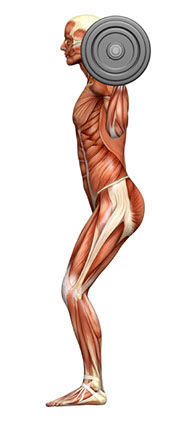
According to Davis’ law, “soft tissue models along the lines of stress” (Siff and Verkhoshansky, 2009). If a muscle experiences constant stress or tension from repetitive movements or chronically poor posture, then it will layer down inelastic collagen fibers as a way to reduce the stress and protect the muscle from damage. Muscle tissue and connective tissue are organized in layers. When collagen binds between these layers, it can reduce their ability to slide against one other and alter the function of involved joints. If individuals move frequently during the aging process and engage in activities that provide changes in velocity and direction of movement (e.g., learning new dance routines or forms of martial arts), then they create a more elastic, resilient myofascial network. However, if individuals become sedentary and restrict their movement patterns to predictable, repetitive actions, they may experience a significant loss of elasticity from the myofascial system as collagen binds between the fascial layers along the established lines of stress.
For example, people who that spend a large portion of their time sitting down can experience adhesions between the layers of the iliacus and psoas major (commonly called the iliopsoas), which make up hip flexors. When collagen develops between layers of a particular muscle, it can restrict the ability of that muscle to experience a full range of motion. In this case, the tightness of the hip flexors can limit the ability of the femur to go through the movement of extension. As a result, the neural drive to the gluteus maximus (the primary muscle responsible for hip extension) can change and alter the function of the muscle.
This does not have to happen. When training for optimal fascial fitness, Schleip and his colleagues note that “if one’s fascial body is optimally elastic and resilient, then it can be relied upon to perform effectively while offering a high degree of injury prevention” (Schleip et al., 2012). The good news is that the right type of exercise program can enhance the elasticity and structural integrity of fascia, restoring the ability of muscle tissue to perform multiplanar movements at any point along the aging process. Proper loading through exercise can influence a younger, more youthful architecture of connective tissue. Therefore, the older woman in the example can regain the ability to skip, jump and move in multiple directions if she receives the right stimulus from an exercise program. When it comes to training the fascial network, the only difference between young and old is that older adults will need to increase the intensity of training at a slower, more controlled rate of progression.
Identifying Lines of Pull in the Myofascial Network
Following the tensegrity model of structural balance in the human body changes the role of a personal trainer or group fitness instructor to that of a mechanical engineer. Rather than simply having clients do an exercise for a specific muscle, trainers and instructors should instead use integrated movement patterns to help remodel the myofascial system into a more efficient structure that is capable of balancing the ever-present forces of compression and tension. Understanding how forces impact and change an individual’s body during common movement patterns can help a trainer or instructor choose exercises that involve the entire fascial system. It is recommended to start by teaching clients and group exercise participants how to first perform the basic patterns of movement before progressing to integrated patterns involving multiple movements. This will help realign the myofascial network and enhance the biotensegrity of the human body.
Various practitioners who have studied how soft tissue affects human movement have identified specific lines of pull through the fascial system. While there is no absolute right or wrong way to identify a line of pull through the fascial system, it is important to be able to identify how force can be transmitted through a series of muscles that share connective tissue and attachment points. The Tensional Network of the Human Body by Schleip et al. identifies six different models of how to organize muscle, fascia and connective tissue into specific lines of pull (Schleip et al., 2012). The names of various models include “trains,” “slings” and “chains.” However, regardless of the model’s name or creator, each model is only one particular way to organize how force is transmitted through the myofascial network based on how the structures support the function of the locomotor system. All models are based on valid work by experienced professionals and each can provide a structural framework for designing movement-based exercises. The model the American Council on Exercise uses for the ACE IFT Model involves the myofascial slings, as described by Andrey Vleeming and colleagues (American Council on Exercise, 2009).
The Four Myofascial Subsystems or Slings
Vleeming and associates identified four specific slings of fascia responsible for transmitting and controlling forces:
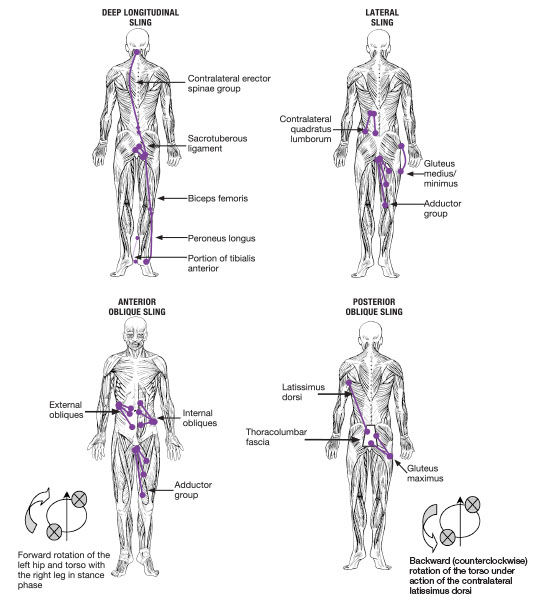
Stability and mobility exercises from the Stability and Mobility phase of the ACE IFT Model can be used as a dynamic warm-up to prepare for the more challenging exercises of the other phases. Bodyweight-only exercises featuring the basic patterns of movement can be used as a progression for a dynamic warm-up, before increasing the intensity and challenge to multiplanar movements using a variety of traditional and non-traditional resistance-training equipment. To develop optimal coordination and have the greatest training effect on the entire myofascial system, it is important to load the fascial system and muscle tissue along specific lines of pull.
Note that gait, or walking, is the default pattern of human movement and involves the shoulders counter-rotating with the contralateral hips to create efficient movement. The most effective exercises for training the entire myofascial system are those that involve both the upper and lower limbs moving at the same time, which is similar to how they function during gait.
The following workout is an example of how to design exercises specifically for Vleeming’s four myofascial slings. Some exercises will simultaneously involve the muscles from more than one sling, which is acceptable as long as the client can maintain good posture and control of his or her center of gravity. Once movement efficiency has been enhanced, the client can progress to either classic resistance training using external loads to improve force output or reactive plyometrics with bodyweight to enhance myofascial elasticity. The client’s fitness level, movement skill and training goal will dictate the specific application of variables (intensity, repetitions, sets and rest interval) for his or her exercise program.
Warm-up
Perform each exercise for eight to 12 repetitions for a total of two sets. Keep rest to a minimum between exercises, 15 to 20 seconds at most.
Workout
Each exercise should be performed for eight to 12 repetitions on each side before progressing to the next exercise. To increase the metabolic and cardiorespiratory demand of the workout, have the client do the exercises back-to-back with minimal rest to create a circuit of a number of exercises; allow one-to-three minutes of rest in between circuits. Begin with two sets of each exercise before progressing to three sets.
This workout features a couple of exercises using the ViPR developed by Michol Dalcourt. It is the first training tool designed specifically to be able to load the entire myofascial system through multiplanar movement patterns involving all parts of the body. If a ViPR is not available, a medicine ball or lightly weighted bar can be used instead.
Exercises for the Anterior Oblique Sling
High-to-Low Cable Chop
The left-side external oblique works with the opposite (right) side internal oblique to create rotation to the right (and vice-versa). This exercise involves the muscles of the Anterior Oblique Sling specifically and is very effective for improving the strength of all of the core muscles to work as an integrated unit.

Start with a moderate weight on the cable stack, the feet slightly wider than shoulder-width apart with the hips flexed, the weight back in the left hip and the arms reaching back over the left shoulder. The right (or away) hand should grip the handle first, with the other hand finishing the grip. Push with the left foot to shift the bodyweight to the right leg while simultaneously rotating the body from left to right. At the end of the movement, the weight should be in the right hip (with the hip slightly flexed) with both hands in front of the right hip. Slowly allow the hands to return to the starting position. Repeat for eight to 12 repetitions and then switch sides.
Standing One-arm Cable Press
This exercise is effective for training the external oblique with the opposite-side internal oblique and adductor complex. It’s also great for integrating upper-body pushing strength with core stability, something that simply lying on a bench to do a chest press does not address.

Start with the feet about hip-width apart, the right arm extended in front of the body and the cable in the left hand. The elbow should line up directly with the wrist and the cable column should be placed at shoulder height. Keep the spine tall and straight, the right foot slightly forward and the core muscles braced. Press the feet into the floor, brace the abdominals and contract the glutes to create stability, while simultaneously pushing the cable with the left hand and pulling the right arm back from the elbow (this helps create rotation around the longitudinal axis of the spine). Slowly allow the left arm to return to the starting position while reaching out front with the right arm. Complete eight to 12 repetitions on one side and then repeat using the other arm.
Standing Bilateral Cable Press
This exercise is an advanced progression from the prone plank and is very effective for creating core stability using the muscles from both the anterior and posterior oblique slings.

Stand to the side of a cable column; position the cable pulley at approximately the same height as the hands when the elbows are bent at 90 degrees. Keep both feet pressed firmly into the ground, contract the abdominal muscles and glutes for added stability and push the cable handle away from the chest. Slowly return to the starting position and repeat for eight to 12 repetitions before switching sides.
Exercises for the Posterior Oblique Sling
Single-leg, One-arm Pull to Balance
During gait, the contralateral shoulder and hip are both flexing and extending at the same time. This exercise mimics that action to improve hip strength and core stability simultaneously by strengthening the muscles of the posterior oblique sling.

Start in a kneeling position with the cable in the left hand, the left knee on the floor directly under the left hip, the right foot planted firmly onto the floor and the right arm held up at shoulder height. Press the right foot into the ground to stand up on the right leg, while pulling back on the left arm and pressing forward with the right. Lift the left leg high in the air and pause for a second at the top before lowering back to the starting position on the right leg. Repeat for eight to 12 repetitions and switch sides.
Single-leg Romanian Deadlift
Training the hip and opposite shoulder to work together engages all of the fascia structures between the two to help increase dynamic stability, especially the larger muscles of the posterior oblique sling—the latissimus dorsi and gluteus maximus.

Start by holding a weight in the right hand while the bodyweight is balanced on the left leg (the right foot can be lightly touching the ground, as shown above). Press the right leg straight back and point the toes (this helps create stability on the left hip) while slowly lowering the weight toward the floor with the right hand. To return to the starting position, think about pulling the ischial tuberosity (bottom of the pelvis) to the back of the femur to fully engage the hamstring and adductor muscles. Repeat for six to 10 repetitions and switch sides.
Exercises for the Lateral Sling
ViPR Side Lunge With Lateral Shift at Hip Height
A great benefit of using the ViPR is that its length can create additional leverage to engage various fascial tissue not used during traditional exercises. Altering the grip on the ViPR can dramatically change the lever-arm of the equipment and increase or decrease the resistance to the desired level. An additional benefit of the ViPR is being able to “shift” the load through gravity as opposed to lifting a load against gravity. Moving a load through the field of gravity can engage a much wider area of the fascial system compared to simply lifting a weight linearly against the pull of gravity.

Start with the feet approximately hip-width apart and hold the ViPR in an offset grip with the right hand on the handle and the left hand on the end of the ViPR tube. Step the right foot to the right in a lateral lunge and push the ViPR to the right with the left hand. The movement of the ViPR beyond the center of gravity will increase the load and strengthen the muscles of the right lateral sling. Complete eight to 12 repetitions and switch sides.
Dumbbell Windmill
The loaded windmill requires the ability to maintain lumbar stability while increasing the range of motion of the right hip. This exercise is NOT recommended for individuals with existing shoulder or back discomfort.

With dumbbell held high in the right hand, position the feet a little wider than shoulder-width apart and externally rotate the left food just a bit. To start the descent, keep the spine straight and push the weight into the right hip, while reaching for the left foot along the inside of the left calf. To return to standing, push the hips to the left and use the obliques on the right side to lift the trunk back to the starting position. Complete six to eight repetitions on one side before switching sides.
Exercises for the Deep Longitudinal Sling
ViPR Anterior Lunge With Reach at Knee Height
An anterior (forward) lunge with a reach will increase the angle of hip flexion and engage the muscles from the bottom of the foot to the top of the back. When learning this exercise, start with just using the arms reaching in front of the knees before progressing to holding a weight.

Begin standing with the feet approximately hip-width apart and hold a ViPR on the outside edges. Step forward with the left foot and lean forward to reach for the foot with the ViPR. Be sure to keep the heel of the right foot pressed into the ground (this will engage the muscles along the posterior portion of the leg). Maintain a neutral spine and focus on getting the motion by flexing the hip rather than by rounding the spine. Complete six to eight repetitions on one leg before switching sides.
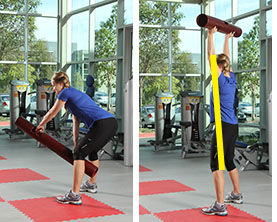
ViPR Hip Hinge With Overhead Lift
The length of the ViPR makes it perfect for engaging and strengthening the fascial lines in a way that traditional weights such as dumbbells and barbells do not allow.
Start with the feet about hip-width apart; hold the ViPR handles in a neutral grip with the left hand on top and the right hand on the bottom. Hinge at the hips while keeping the lumbar spine in neutral and place the ViPR between the legs. Press the feet into the ground, drive the hips forward and lift the ViPR overhead. Rotate the ViPR counter-clockwise at the top of the movement. To return to the starting position, rotate the ViPR clockwise and hinge back into the hips while maintaining a straight spine. Perform six to eight repetitions with the left hand on top, and then perform the exercise with the right hand on top.
Cool down by performing static stretches for the hip flexors, hamstrings, back and shoulder muscles.
Final Thoughts
Most non-contact injuries occur when connective tissue is stretched faster than it can respond (Myers, 2011). As an individual learns the movements and improves his or her movement efficiency, the intensity of the exercises can be increased by using a faster tempo to challenge the elasticity of the myofascial system. The challenge and elasticity of training can also be increased by changing the lunging exercises into bounds (i.e., hopping from one foot to the other). For example, doing the side lunge with a shift as a lateral bound from one foot to another will enhance the elasticity of the lateral sling. Likewise, doing an anterior bound from the right to the left foot while reaching forward with the ViPR will challenge the elasticity of the deep longitudinal sling.
It is important to understand that while there is a tremendous amount of evidence supporting this fascia-first style of movement-based training, there will be many clients who do not feel comfortable being asked to move in a number of different or unique ways in a public setting. It is important to have a strong rapport with a client to be able to determine whether or not she or he might enjoy doing new, non-traditional exercises. If a client has movement restrictions or is self-conscious, then asking him or her to perform complex movement patterns in a common area of a health club or studio could cause anxiety. While there are numerous benefits to multiplanar training, if a client wants to continue to use fixed-path selectorized machines, trainers must respect the client’s wishes and use the rest period between exercises to challenge the client with unloaded movement patterns as a form of dynamic flexibility training.
“Fascia is the organ system of stability and mechanoregulation,” writes Thomas Myers in his book, Training the Myofascial Web (2011). Understanding how the entire myofascial system is connected and can be organized into distinct lines of pull can provide you with the information necessary to create a wide variety of exercises to improve your clients’ fascial integrity. There is no guarantee that an exercise program that challenges the fascial structures to perform dynamic multi-planar movements can give a 70-year-old with limited mobility the boundless energy of a four-year-old, but it can help improve a client’s movement efficiency and quality of life in a relatively short period of time.
References and Resources
American Council on Exercise (2010) ACE Personal Trainer Manual (4th ed.). San Diego, Calif.: American Council on Exercise.
American Council on Exercise (2009) ACE Advanced Health & Fitness Specialist Manual. San Diego, Calif.: American Council on Exercise.
Ingber, D.E. (2003). Tensegrity II: How structural networks influence cellular information processing networks. Journal of Cell Science, 116, 1397-1408.
Myers, T. (2009). Anatomy Trains (2nd ed.). London: Elsevier.
Myers, T. (2011). Fascial fitness: Training in the neuro-myofascial web. IDEA Fitness Journal, 38-45.
Schleip, R. et al. (2012). Fascia: The Tensional Network of the Human Body. London: Elsevier.
Siff, M. and Verkhoshansky, Y. (2009). Supertraining (6th ed.). Denver, Co.: Supertraining Institute.
_______________________________________________________________________
 Pete McCall, M.S., an Exercise Physiologist with ACE, creates and delivers fitness education programs to uphold ACE’s mission of enriching quality of life through safe and effective exercise. He has a master's degree in Exercise Science and Health Promotion. In addition, he is an ACE-certified Personal Trainer and holds additional certifications and advanced specializations through NSCA and NASM. McCall has been featured in The Washington Post, The New York Times, Los Angeles Times, Runner’s World and SELF.