By now, you’ve heard a lot about the many advantages of high-intensity interval training (HIIT) for health, fitness, weight loss and athletic performance. You’ve probably done plenty of HIIT workouts yourself and taught it countless times in fitness classes or to training clients. Still, there’s always more that fitness pros can learn about how to deliver the best and safest programs to clients, and HIIT is no exception.
With that in mind, have a look at the six HIIT exercises shown here, curated with permission from a comprehensive new book called The HIIT Advantage: High-Intensity Workouts for Women (Human Kinetics, 2016) by Irene Lewis-McCormick. Consider how you might apply this 20-minute high-intensity workout to training sessions, fitness classes or even your own workouts. But first, heed the book author’s recommendations (below) for ensuring the safest and most efficient HIIT routines possible. (Note: Although the book featured here was designed for women, the workouts are also applicable to male clients.)
A Look Inside The HIIT Advantage
The HIIT Advantage provides a well-organized and research-based reference guide for fitness consumers or trainers/instructors who plan high-intensity interval workouts for their clients. In addition to numerous exercise photos and descriptions, the book includes the following information, and more:
- Physiology of HIIT
- Role of recovery
- Popular HIIT protocols (e.g., mixed interval, max interval, timing interval)
- Incorporating tools
- Exercise selection menus
- Suggested routines (20, 30, 45 minutes)
Warming Up
HIIT workouts are known for being especially time-efficient, which makes it all the more tempting to hasten the warm-up. But don’t. Be sure to adequately address two components of warming up:
- a thermal warm-up for increasing core temperature and lubricating joints, and
- exercises specific to the workout ahead.
“Once the body is warm, the movements should mimic what participants will be doing in the workout,” says Lewis-McCormick. “If there will be plank poses and squat jumps, the warm-up should included regressed versions of these moves.” This approach provides an additional benefit beyond warming up because clients get a preview of easier movement options. “The options for decreased intensity are introduced in the warm-up, so clients and class participants know what to do if the moves become unsustainable,” says Lewis-McCormick.
Safely Managing Intensity
Anyone who’s attempted a HIIT workout knows that some drills can be quite challenging. Not all clients or participants will be able to handle all HIIT exercises all the time. In these cases, Lewis-McCormick recommends staying true to the interval ratio you’ve chosen, if possible, but offering “strategies for success” to help a client get through a tough sequence. Lewis-McCormick suggests the following three options for lessening intensity in the midst of a HIIT set:
- Limiting a movement’s range of motion
- Slowing down the movement
- Lightening the load, if applicable
“Participants should be encouraged to stay committed to the intervals as programmed, but trainers can guide intensity and make changes to the intervals based on a client’s needs, fitness level and ability,” she says.
Ensuring Adequate Recovery
Clients who place little importance on the rest and recovery aspects of HIIT are more likely to get injured or experience overtraining. As a heath and fitness professional, you can educate your clients and class participants about limiting high-intensity training so it doesn’t become a daily occurrence.
“It is imperative that those using interval training take recovery between workouts,” says Lewis-McCormick. “This is to ensure sustainability and injury prevention in addition to the fact that most of the benefits of this type of training with respect to adaptations occur between the workouts.” Recovery between workouts might vary between 24 and 36 hours, according to Lewis-McCormick, depending on the intensity of the intervals performed.
20-minute HIIT Workout
Excerpted from The HIIT Advantage: High-intensity Workouts for Women by Irene Lewis-McCormick (© 2016). Reprinted with permission from Human Kinetics. Find The HIIT Advantage at HumanKinetics.com, your local bookstore or at major online bookstores.
Total time: 20 minutes
Focus: Lower body and core
Warm-up: 3-5 minutes
Interval ratio: Tabata (20 seconds of work/10 seconds of recovery, eight times total); four minutes total per set, featuring either one or two exercises per four-minute set (see instructions below)
Recover between each four-minute sequence: 60-90 seconds
Cool-down: 3 minutes
Warm-up
After three to five minutes of a basic warm-up—doing light-intensity cardio, such as treadmill walking, jogging or using a stationary bike or elliptical—perform easy exercise-specific movements such as squats, lunges, torso rotations and squat to plank (described below).
Squat to Plank
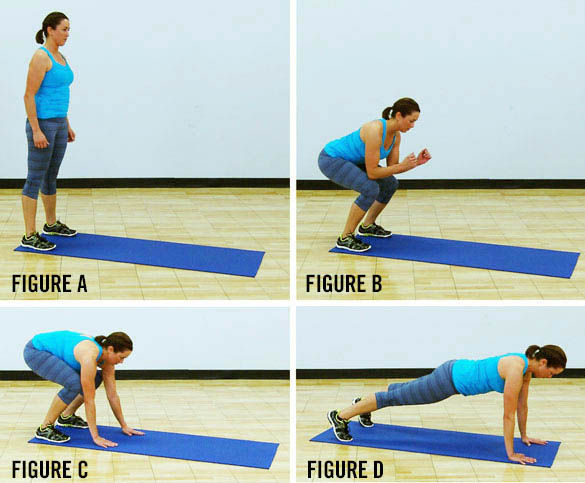
From a standing position (Figure a), lower into a deep squat (Figure b) and then place your hands on the floor and walk your hands forward until you are in a plank pose (Figures c and d). Use your hands to walk back to your feet, rising up first into a deep squat and then back to standing. Do five times total.
The Workout
Quarter-turn Squat
Perform four minutes total (20 seconds of work/10 seconds of recovery, eight times)
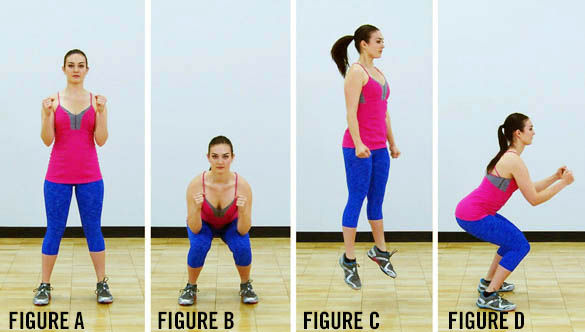
Stand with feet parallel and slightly wider than hip width and toes turned slightly out (Figure a). Maintaining an erect spine, lower the tailbone down toward the floor, pressing the hips back and maintaining a neutral neck with your chin parallel to the floor (Figure b). Rise back to upright, jump up, and make a quarter turn into a squat (Figures c and d). Repeat the squat and continue to include the quarter turn with the power jump. If you start to feel dizzy from the turning, just maintain the squat jump or perform the quarter turns by alternating to the right and left.
Squat Jack
Perform two minutes total (20 seconds of work/10 seconds of recovery, four times), combining with the Brazilian Lunge (below)
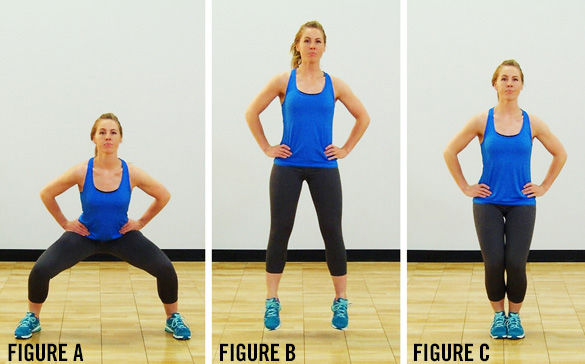
Begin with feet together and then jump out into a wide squat stance as if performing the jump-out phase of a jumping jack but much slower. When you jump out, lower into a squat and hold until you feel stable (Figure a). Return to the starting position with a jump into the upright standing posture (Figures b and c). This exercise may be performed faster or slower based on your goals and ability to stabilize.
Brazilian Lunge
Perform two minutes total (20 seconds of work/10 seconds of recovery, four times), combining with the Squat Jack (above)
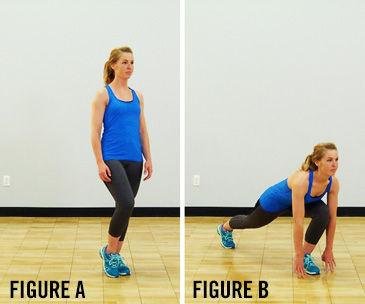
Begin standing upright (Figure a) and lower into a runner’s lunge by placing the left foot directly under the left knee and placing both hands lightly on either side of the front foot, with as little weight as possible in the hands and fingertips (Figure b). The back leg is extended with the knee straight and the hamstrings lifted as high as possible. Use the back foot to step in, placing the feet parallel to each other, and rise to an upright stance. Step back again with the right leg, lowering to the starting position, and repeat. Increase the intensity of this exercise by adding a knee lift or a single-leg hop. Repeat on the same lead leg as described, and then switch legs.
Bridge
Perform two minutes total (20 seconds of work/10 seconds of recovery, four times), combining with Full Bicycle Crunch (below)
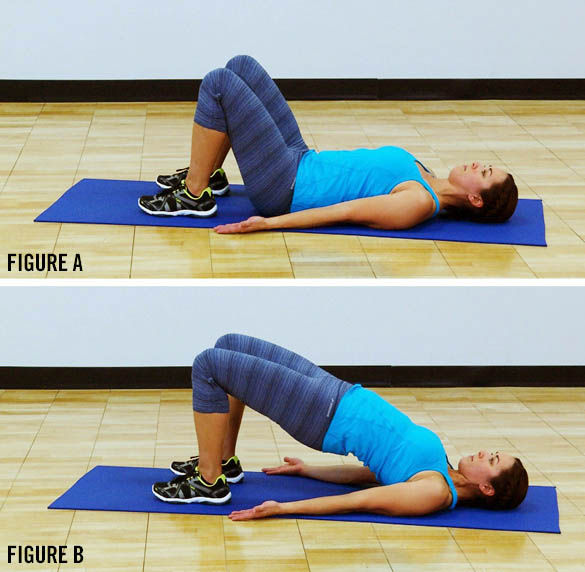
Lie on your back with your feet hip-width apart and your head and shoulders relaxed. Extend your arms out on the floor, reaching toward the heels with palms face up (Figure a). This will guide you in foot placement relative to your body length. Lift your hips as high as possible, squeezing your gluteals as you drive the hips up. Keep your shoulders and neck relaxed and your chin tucked (Figure b). Pause at the top, and then lower to the floor and repeat.
Full Bicycle Crunch
Perform two minutes total (20 seconds of work/10 seconds of recovery, four times), combining with Bridge (above)
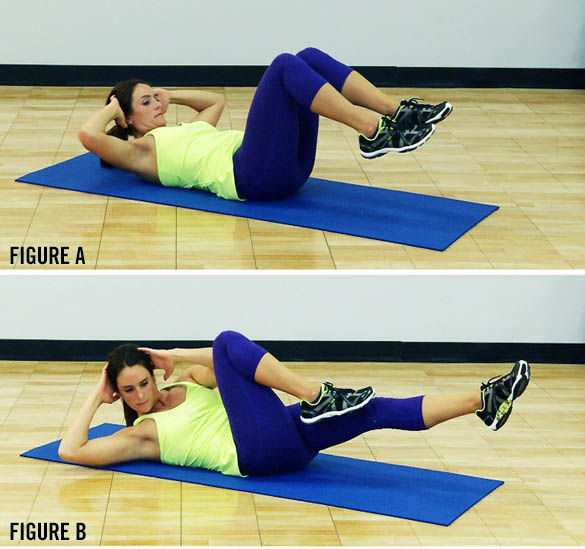
Begin on your back, drawing your knees into your chest (Figure a). Place your fingertips lightly behind your ears on the base of your skull, elbows pointing out. Twist through your center, bringing the left elbow to touch the right knee as you extend the left leg (Figure b), and then extend the right leg while simultaneously pulling the left knee into the chest and touching the right elbow to the left knee. The leg pattern is called the switch. Continue to alternate—pull the right knee up and touch it with the left elbow, and then pull the left knee up and touch it with the right elbow. Continue to alternate, bringing the right elbow to the left knee and the left elbow to the right knee. Be precise with the foot-to-knee contact to create more tension in the anterior core and abdominal area.



 by
by 


