When it comes to looking good, everyone wants great abs to help them feel confident in and out of clothes. When it comes to feeling great, everyone wants a pain-free back so they can participate in activities they love. Unfortunately, many traditional abdominal exercises recommended for awesome abs can actually make back pain worse. However, it is entirely possible to develop great abs and maintain a pain-free back. In this article, you will learn how the abdominal muscles can protect the back from pain and injury, how gravity and ground reaction forces influence the role of the abdominals in safeguarding the back, and which exercises are the best for training the midsection to create a washboard stomach and a pain-free back.
Abs and Back Pain?
When people think about the role the abdominals and other trunk muscles play in helping prevent back pain they typically consider the deep core stabilizing muscles such as the transverse abdominis, pelvic floor and diaphragm. While these muscles are important for providing stability of the pelvis and trunk, it is largely the job of the rectus abdominis and internal and external obliques to control the forward, backward, side-to-side and rotational movements of the spine (Golding and Golding, 2003). These more superficial abdominal muscles are also largely responsible for making the midsection look aesthetically pleasing.
Fitness professionals are taught many key anatomy concepts. For example, you learned that the rectus abdominis helps flex the trunk because it travels from the front of the rib cage to the bottom of the pelvis and, when contracted, pulls these two structures closer together to flex the spine. You were also taught that the obliques help flex, rotate and side bend the trunk because they attach to the rib cage, run up and down to the pelvis and wrap around the trunk to midline of the abdominals (i.e., linea alba) (Gray, 1995). That is why sit-ups, crunches, side crunches and oblique crunches are typically recommended to help clients strengthen their abdominal muscles and protect the spine. However, these types of exercise strategies for the abdominal muscles are potentially flawed and can actually set up clients for pain and injury.
 Forces of Nature
The spine experiences stress all day long as it moves in multiple planes of motion. When walking or running, for example, gravity is constantly pulling your trunk down and forward toward the ground. The muscles on the back of your spine (i.e., erector spinae muscles) work in an elongating manner to fight this force of gravity so you do not fall forward on your face. As each foot strikes the ground, impact (or ground reaction forces) is then transferred back up through the body from the ground to your spine. When this force is transferred back up the spine, the rectus abdominis absorbs this impact by lengthening so the structures of the spine do not experience excessive compressive forces as it is pushed into extension by this impact (Figure 1) (Price and Bratcher, 2010).
The abdominal muscles on the sides of your torso (i.e., the obliques) are also fighting the forces of gravity as you take alternating steps when walking and transferring weight from side to side. This side-to-side movement causes the spine to side flex from left to right. As it bends to the right, the oblique muscles on the left side of the trunk (in conjunction with other muscles such as the quadratus lomborum) lengthen to slow the spine down so you do not topple over to the right (and vice versa when your spine bends to the left) (Figure 2).
 The trunk and spine also rotate when you are walking as you swing your arms from side to side. While your body does not have to fight gravity or ground reaction forces during rotational movements, your oblique muscles do have to work like bungee cords to slow down the rotational movements of your trunk and arms so compressive forces are not transferred to the spine (Figure 3) (Price and Bratcher, 2010). As you can see, these muscles of the abdomen play a vital role in helping decelerate movement in the spine and protect it as it moves in all three planes of motion.
Well-functioning abdominal muscles and a pain-free back are intrinsically linked to healthy and functional gluteal muscles. Because the abdominal muscles and the gluteals attach to the pelvis, these sets of muscles function together to control the leg, hips, pelvis and spine as you move. For a much more detailed explanation of the gluteal muscles and their role in helping prevent back pain, read the ACE ProSource article, Build Strong Glutes and a Pain-Free Back.
How Traditional Ab Exercises Can Make Back Pain Worse
Most abdominal workouts contain variations of plank and abdominal bridging exercises to strengthen the muscles that help stabilize the pelvis, spine and rib cage for movements that require the body to brace for protection or in preparation for lifting. As discussed earlier, these stabilizing muscles are extremely important and are an integral part of any abdominal training program. However, sit-ups, leg raises, crunches and side crunches typically also make up a substantial portion of many ab-training routines. While these exercises are useful for activating the rectus abdominis and oblique muscles to help build muscle, when overused they can actually lead to back pain (McGill, 2007).
As discussed earlier, the rectus abdominis and oblique muscles help flex the trunk. This is why the majority of people believe sit-ups, and variations thereof, train the abdominal muscles most effectively. However, abdominal crunches that fix the legs in place to provide leverage, that require lifting and lowering of the legs, or that are performed through a full range of motion and require the lumbar spine to leave the floor, all increase compressive loads to the spine and lead to possible injury. This is because these movements involve contraction of the hip flexor muscles (which originate on the lumbar spine, cross the pelvis and hip and attach to the top of the leg) (Golding and Golding, 2003). When activated, these muscles do help flex (bend) the hip, but they also pull the lumbar spine forward (into extension) toward the leg, which compresses the discs that lie between the vertebrae of the lumbar spine beyond a load that is considered safe (McGill, 2007).
A Better Approach to Abdominal Training
As stated earlier, the abdominals muscles work in unison with the gluteal muscles to help control movements of the spine, pelvis, hips and legs. In fact, the interconnectedness of the body means there are also many other muscles in both the upper and lower body that work with the abdominal muscles to help protect the spine from injury. Here’s an example: The oblique muscles wrap around the torso and blend into the serratus anterior muscle, which continues upward to wrap around the rib cage and underneath the shoulder blade. The serratus anterior then blends into the rhomboid muscles that travel from the edge of the shoulder blade to the spine and into the muscles of the neck (Myers, 2014). In the lower body, the obliques blend into many muscles and soft tissues that go on to make up the lower leg such as the tensor fasciae latae, iliotibial band, tibialis anterior and peroneus longus (Myers, 2014). As such, abdominal training should embrace a whole-body approach that centers on the abdominal muscles, but also integrates multiplanar movements of the entire body to ensure proper functioning of the whole system.
Gradual Progression
While an integrated approach to abdominal training is the ultimate goal of this program, it is important to note that musculoskeletal imbalances and dysfunction in other parts of the body can affect the success of the exercises detailed below. For example, when you take your arm back in the “Step Back With Arm Raise” exercise, the rectus abdominis must lengthen under tension like a bungee cord to slow down the spine as it arches backward and the arm is taken up and back. As you step backward in that exercise, the rectus femoris muscle (a quadriceps muscle) should also lengthen under tension to help slow down the leg as it travels behind the hip (i.e., into extension). However, if there are myofascial restrictions in the rectus femoris and it is unable to lengthen effectively, the majority of the load of this movement is placed on the rectus abdominis muscle. While this may seem advantageous for achieving maximal muscle loading to a specific muscle, it can also set up the spine for injury. Therefore, to help prepare all the muscles of the body that are required for the integrated abdominal training program that follows, instruct clients to complete a structured warm-up routine before performing these exercises. The warm-up below includes self-myofascial release techniques to release any restrictions and stretching exercises to promote flexibility and facilitate smooth transitions and movement across all body parts.
Self-myofascial Release Techniques
Use a tennis ball or foam roller to perform self-myofascial techniques to prepare the major muscles of the body for the stretches and subsequent full-body, multiplanar abdominal exercises that follow. Focus your attention on the calves, quadriceps, hip flexors, glutes, abdominals, back, and muscles of the shoulder and arm. This comprehensive self-myofascial release warm-up takes approximately 10 minutes to complete. However, it can be utilized as the mainstay warm-up strategy for all your full-body integrated workout programs. Encourage clients to arrive at least 15 minutes prior to their workout time so they can perform self-myofascial release techniques (like those shown here and here) and stretches (shown below) before you get started with their regular program.
Stretches
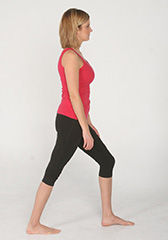
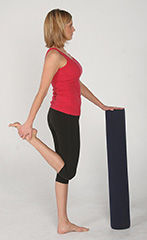
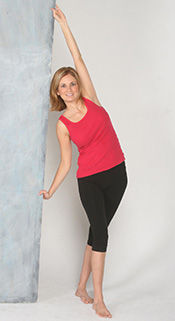
Once your client has increased the blood supply and released any myofascial restrictions utilizing the self-myofascial release techniques, have him or her perform isolated stretches for these body parts before progressing onto the integrated strengthening. Examples of these stretches are shown below.
|
Calf Stretch
|
Quadriceps Stretch
|
Abs, Shoulder and Arm Stretch
|
|
Hip Flexor Stretch
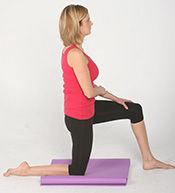
|
Glute and Back Stretch
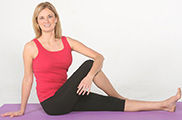
|
Arm, Chest, Glutes and Back Stretch
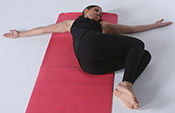
|
Integrated Strengthening Exercises
The following integrated strengthening exercises are designed to tone and fortify the abdominal muscles by training the whole body how to lengthen under tension (like a bungee cord) to help decelerate load to the spine as it moves into extension, side to side and in rotation.
Eccentric Crunches on the Ball
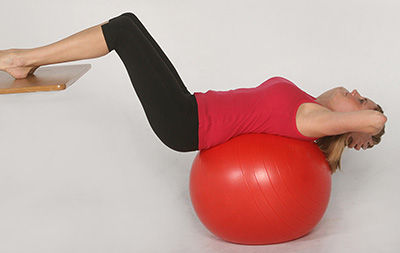 This is a great exercise to introduce your client’s abdominals to eccentric training. By practicing the lengthening of the abdominals to slow down spine extension in this first exercise, your client can progress more successfully to the advanced exercises that follow.
Sit on a gym ball (with your butt toward the back of the ball) approximately 2 feet away from a bench (or wall). Place the feet on a bench and gently walk up/pull the body toward it as while rolling the butt forward on the ball. Eventually you want your client to end up lying on the ball with his or her feet on the wall or bench. (Place a chair beside the client for balance when he or she first attempts this exercise, if necessary.) Once in position, lift the hips up and slowly lower the spine into extension (arching it) over the ball. The goal of this exercise is to strengthen the abdominals in a lengthening manner to safely lower the back over the ball, not to strengthen the abdominals by training flexion of the spine. As such, when the client returns to the starting position, instruct him or her to not curl the spine up to a position where it is past being parallel with the ground. During the lowering movement over the ball, be sure the client keeps the hips up. Perform eight to 20 repetitions for one to three sets, two to three times a week.
Step Back With Arm Raise
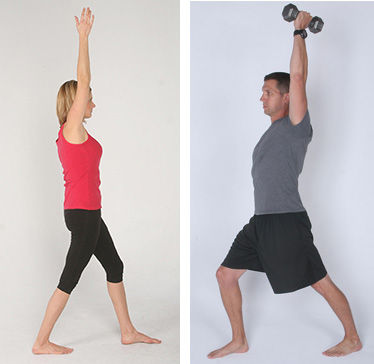
This exercise integrates the calves, hip flexors and abdominals to help slow down hip and spine extension.
Start with the feet hip-width apart, feet facing forward and the spine tall and erect. Step back with the right leg while raising the right arm overhead. Pay attention to the feet and do not cheat the movement by turning either foot out while stepping backward. Return to the starting position and repeat the same movement with the left leg and left arm. Focus on lengthening the abdominals to slow down the movement of the spine arching backward as the arm reaches up and back overhead. As your client begins to feel more confident with this movement, progress this exercise by using a very light dumbbell (1 to 3 pounds). Perform a total of 16 to 20 repetitions for one to three sets, two to three times a week.
Side-to-side Swaying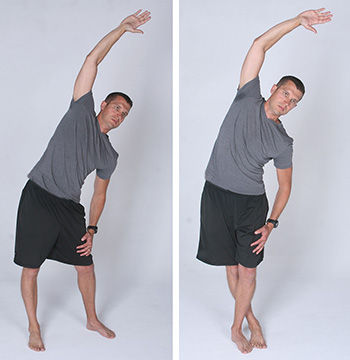
This exercise utilizes the oblique muscles, in conjunction with other lateral trunk and hip muscles (i.e., quadratus lumborum, tensor fascia late, abductors, etc.) to slow down the spine as it moves from side to side.
Begin this exercise by standing with the feet hip-width apart, facing forward and the spine erect and tall. Push the right hip to the right so that it moves past the outside of the right foot. As the hip moves to the side, raise the right arm overhead while flexing the spine and lowering the left shoulder. Return to the starting position and then push the left hip outside the left foot while simultaneously raising the left arm overhead and dropping the shoulder to the right. You can progress this exercise by using light dumbbells (1 to 3 pounds) or crossing the opposite leg over the standing leg (see picture above). Perform this side-to-side swaying movement back and forth for a total of 16 to 20 repetitions for one to three sets, two to three times a week.
Step Forward and Backward With Rotation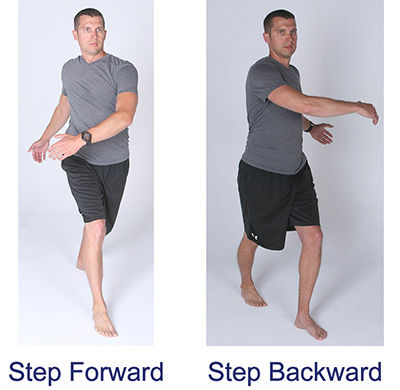
This integrated abdominal exercise recruits the oblique muscles (along with other muscles that help slow down hip rotation such as the hip rotators and glutes) to slow down the torso as it rotates to help reduce shearing forces to the spine.
Step forward with the right leg from a standing position. As the client steps forward, instruct him or her to rotate both arms across the right thigh so that the torso turns over the right leg. Keep the spine erect and head and eyes looking forward. Next, step the right leg behind the body and rotate the arms across the left leg. Make sure both feet are pointing forward while performing this movement. Perform 10 full repetitions on each side for one to three sets, two to three times a week.
Conclusion
Properly designed abdominal training can be a very rewarding experience, for both you and your clients. It can help improve the aesthetic look of the midsection while also strengthening the muscles that protect the back. Utilizing strategic self-myofascial release techniques, isolated strengthening and subsequent integrated, full-body strengthening exercises to train the abdominals in all planes of motion can help your clients achieve the sculpted torso they desire while also safeguarding their backs from pain and injury.
Become a BioMechanics Method® Corrective Exercise Specialist

Want to learn more about how you can help your clients exercise with less pain? The BioMechanics Method® Corrective Exercise Specialist online course (TBMM-CES) is specifically designed to give fitness professionals a step-by-step process for helping clients overcome muscle and joint pain. Created by Justin Price, one of the top musculoskeletal assessment and corrective exercise experts in the world, this course will give you the postural assessment, anatomy, corrective exercise and program design skills necessary to help clients become pain free. This self-paced study course is valued at 8.0 ACE CECs and includes digital textbooks, videos and online quizzes.
References
Golding, L.A. and Golding, S.M. (2003). Fitness Professional’s Guide to Musculoskeletal Anatomy and Human Movement. Monterey, Calif.: Healthy Learning.
Gray, H. (1995). Gray’s Anatomy. New York: Barnes and Noble Books.
McGill, S. (2007). Low Back Disorders: Evidence Based Prevention and Rehabilitation. Champaign, Ill.: Human Kinetics.
Myers, T. (2014). Anatomy Trains: Myofascial Meridians for Manual and Movement Therapists. Edinburgh, Scotland: Churchill Livingstone.
Price, J. and Bratcher, M. (2010). The BioMechanics Method Corrective Exercise Educational Program. San Diego, Calif.: The BioMechanics Press. www.TheBioMechanicsMethod.com



 by
by 

 Forces of Nature
 The trunk and spine also rotate when you are walking as you swing your arms from side to side.


 This is a great exercise to introduce your client’s abdominals to eccentric training. By practicing the lengthening of the abdominals to slow down spine extension in this first exercise, your client can progress more successfully to the advanced exercises that follow.


