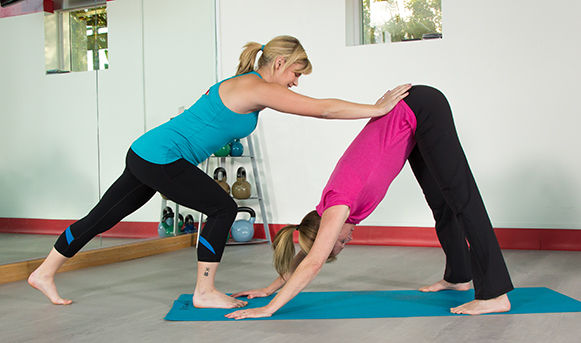
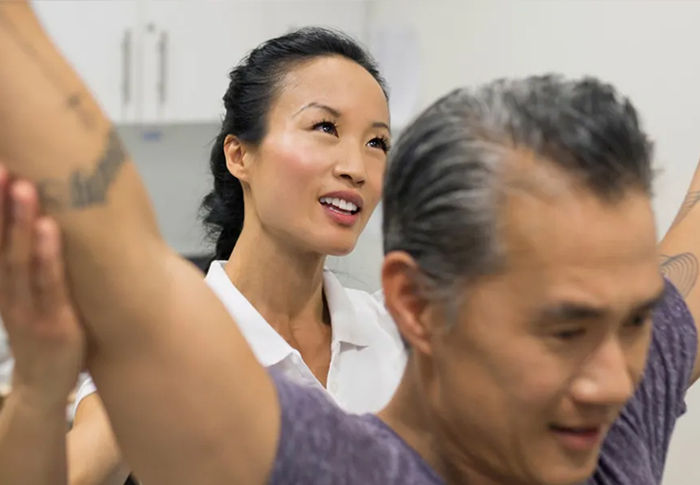
In yoga, performing a physical “adjustment” or “assist” refers to the practice of correcting or enhancing your student’s posture with hands-on, bodily corrections.
An adjustment may be gentle and subtle, as when using your fingertips to lightly guide a student’s shoulders downward to release neck-and-shoulder tension. Or, it could be very firm and use much of your body weight to execute, as when leaning upward on a student’s sacrum in downward facing dog (an adjustment described later in this article.)
As a personal trainer or group fitness instructor, you may already be familiar with some types of hands-on physical assists in the weight or group exercise room. For example, you might use your palms to guide a client’s elbows upward during a set of overhead dumbbell presses.
However, “yoga adjustments are more than just having the correct technique of touch,” says renowned yoga expert and ACE-certified Fitness Professional Stacy McCarthy. “There is an energy exchange, proper breathing and state of mind that are needed to execute safe and effective adjustments.”
Indeed, yoga adjustments are as much an art as they are a science. Here’s what you need to know to correctly, safely and professionally perform physical assists when teaching this ancient practice.
Before You Begin
“Touch can provide the nurturing, caring component that people look for in a world where they are always looking after others,” says Suzette O’Byrne, a faculty member with Mount Royal University’s Yoga Therapy Program in Calgary, Alberta, and author of Yoga for the Core: Finding Stability in an Unstable Environment (Eastland Press, 2007). “This is an opportunity [for the yoga student] to receive, rather than give.”
Adjustments can increase a student’s awareness, focus, self-confidence and improve physical alignment, says Beth Shaw. Shaw is the founder of YogaFit, an educational partner with ACE that has provided fitness facility-friendly yoga training to more than 200,000 instructors worldwide. “However, touch can also be harmful or injurious if not done with the appropriate amount of consideration for the student,” she cautions.
That’s why you must first understand the “Golden Rule” of adjusting: When in doubt, don’t.
“Physical touches are not something you need to provide to create an effective class experience,” says Jessica Matthews, M.S., an assistant professor at MiraCosta College in San Diego, Calif., where she leads courses in the Yoga Certification program.
Heed these five rules before adjusting anyone:
1. Know your class. “Physical touches and adjustments should only be given once you have first developed a rapport with your students,” says Matthews.
2. Know your yoga. Before adjusting, develop a strong personal practice and be able to proficiently teach an entire yoga class using only verbal and visual cues, says Shaw, who is based in Los Angeles, Calif., and is the author of YogaFit (Human Kinetics, 2008).
3. Know your anatomy. Learn the art of adjusting from a credible, credentialed and seasoned yoga teacher, says Matthews. You must develop a deep understanding of anatomy, kinesiology and correct alignment within the poses that you teach, she adds.
4. Know your facility’s policies. A fitness center that includes yoga on its group exercise schedule may have a different physical-touch philosophy than a traditional yoga studio. Indeed, many gyms do not allow adjustments whatsoever for fear of legal action, notes McCarthy, who is based in San Diego, Calif., and has authored an entire book about adjustments called Transformational Teaching Through Yoga Adjustments (Yoga Namastacy, 2012).
Regardless of the type of facility in which you teach, keep your liability insurance up to date and check with your manager before you adjust anyone.
5. Know your alternatives. Finally, if you don’t feel comfortable with a hands-on approach, simply use visual or verbal corrections instead, suggests McCarthy. This might mean modeling appropriate modifications or prop use next to a student who needs it, or giving personalized verbal assistance to a struggling participant.
The Art of Hands-on Help
“Adjustments should be done only with great care, consideration and understanding of what best serves the student,” says Matthews. Here’s how to get them right.
How to Ask Permission
You can ask clients individually for permission and feedback, both before and during the adjustment, adds McCarthy. Also consider asking permission from the group as a whole at the beginning of class.
To do so, Matthews broaches the subject of adjustments at the start of the yoga practice, when participants have privacy while in an eyes-closed posture, such as child’s pose (balasana).
Matthews first asks students to place their hand(s) on any areas of their bodies that need extra attention or care. “I ask if there’s anyone who prefers that I share my energy with them in a way that does not involve physically touching them to simply flip both palms to the sky,” she explains.
Similarly, during the final relaxation (savasana) portion of class, O’Byrne asks those who would like a shoulder adjustment to wiggle his or her fingers. “And usually there are then some pretty excited wiggling fingers!”
Practice. Do not experiment with new-to-you assists on your yoga students in class, says Matthews. Instead, first practice any physical technique variations or novel ideas outside of class, on a colleague, to gain confidence and feedback.
Ask permission. While many students greatly appreciate physical adjustments, other students prefer to preserve their personal space, notes Shaw. “It’s very important, as instructors, that we ask about our students’ preferences instead of assuming touch is okay. This is also a very important liability issue.” she says. (See the sidebar: “How to Ask for Permission.”)
Adjust both sides. For example, if you physically assisted a particular student during a right-leg-in-front pigeon pose (Eka Pada Rajakapotasana I, described here), do the same on the left. This promotes a balanced practice for the student when performing asymmetrical postures, says Matthews.
Release adjustments slowly. “When adjusting a student in a pose it is so important that you stay with them throughout the entire pose, which includes when they are [moving out of] the posture and preparing to transition to the next one,” says Matthews. “Students should never feel as if you’ve abandoned them mid-pose.”
Convey unambiguous intent. Don’t wrap your fingers around a student’s limb or lightly run your fingers down their bodies, which could easily be mistaken as sexual or sensual contact.
Instead, touch clients with the palm or heel of your hand when possible, says Matthews. Try to touch “hard” spots on your student’s body (such as a joint) instead of “soft” spots (such as a muscle belly), which are typically more sensitive, says O’Byrne. And never touch a client’s buttocks, breasts or genitals for any reason.
Use assists to enhance learning, not dependence. Consider that your adjustments should encourage your students to perform a pose or movement correctly—by themselves and without your help, says Shaw. “Your role is to guide your students’ bodies instead of forcing, pushing or shoving.”
COMMON ADJUSTMENTS EXPLAINED
Shoulder Alignment in Arms-overhead Poses
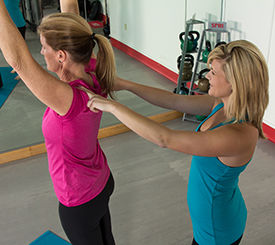 Adjustment newbies should first focus on touches that promote proper alignment, says Matthews. Here’s one of her favorites for novices, which can be used for any yoga pose in which the student’s arms extend overhead.
To remind students to depress the scapulae, stand behind the client (without your body touching the back of their body.) Extend just your pointer and middle fingers on each hand. Say “release your shoulders away from your ears” and at the same time place the tips of the two fingers on top the shoulders and gently guide the student's shoulders down.
Establishing Hand or Foot Base
“When making adjustments, it is most effective to build poses from the ground up,” says Shaw. Here are two approaches Shaw uses to emphasize postural stability:
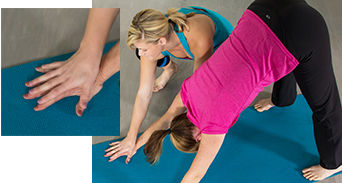 Hands: For poses with “starfish” hands on the ground (with fingers spread wide, such as downward facing dog) gently and firmly place your hands over the student’s hands. At the same time, verbally remind her to spread her fingers wide and press her entire hand into the floor.
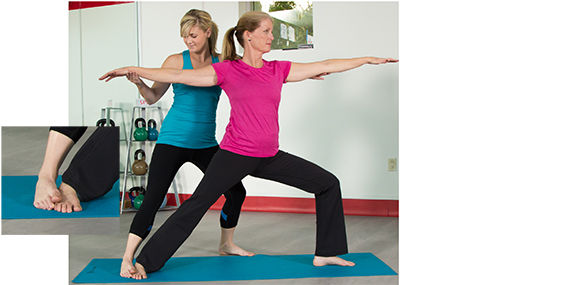
Feet: For standing postures (such as Warrior poses), stand next to the student. Gently, but firmly place your own toes on the part of the student’s foot that may incorrectly lift off the floor (such as the outside edge of the student’s rear foot in a Warrior I pose).

Downward Facing Dog (Adho Mukha Svanasana)
Stand in front of the student. Place your feet in a mini-lunge, with one foot between your student’s hands, the other staggered behind. Place both palms on the student’s sacrum, and begin guiding it upward (not laterally or downward). Stay on the sacrum and avoid pressing on the lumbar spine, cautions Shaw.
Warrior I (Virabhadrasana I)
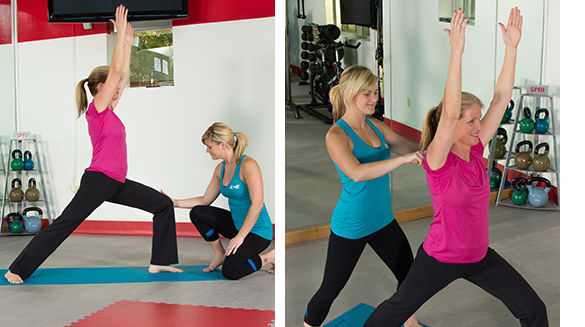
Lower body: Standing or kneeling in front of or beside the student, place your hand where the front knee should be. For example, if the students’ front knee is falling inward (front foot pronation), place your hand in the air above his ankle at knee height. Then, ask him to bring his knee toward your hand, says Shaw.
Upper body: Standing behind the student (straddle the student’s rear lower leg), draw your fingertips upward and along the shoulder blades to encourage his torso upward. Then place your palms on top his shoulders to encourage shoulder depression and retraction.
Warrior II (Virabhadrasana II)
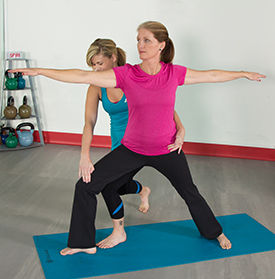
Stand behind the client. Assuming the student has her left foot forward, press the outside of your right hip into the back of her left hip, says Shaw. Place your right hand on the inside of her right hip bone, and your left hand on the inside of her left knee. Gently guide both into a straighter line, aligning the knee over the ankle. Ask the student to tuck her tailbone and pull in her abdominals.
Corpse Pose (Savasana)
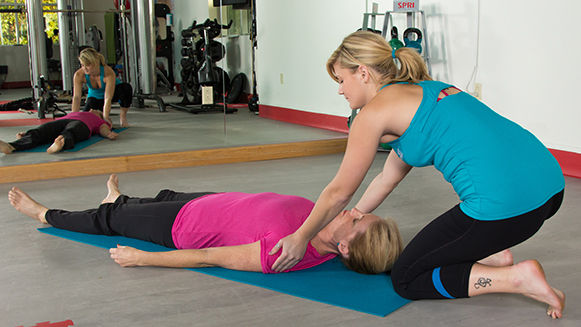
“Adjustments to savasana [end-of-class, lying-down relaxation] positions seem to be the most-requested and rarely denied adjustments that keep my clients coming back for more,” says O’Byrne. So what’s an effective corpse pose adjustment?
Kneel near the top of the client's head and gently place one hand on each shoulder, cupping the top of the shoulder with the palms of the hands. As the student exhales, apply a slight downward pressure on the front of both shoulders to accentuate the gentle stretch of the chest muscles.
The Big Picture
Touch can take a student from a potential injury to safety, and from discomfort to freedom and joy in a posture, says McCarthy. But, she adds there are no one-size-fits-all adjustments, and your role is not to “fix” a pose or the participant.
“Instead, help your students find their best expression of the pose,” she continues. “See the beauty in the pose first. See the divine in your students. See the whole person, not just the parts and technique. And remember, how you move into and out of an adjustment is as important as the adjustment itself.”


 by
by 

 Adjustment newbies should first focus on touches that promote proper alignment, says Matthews. Here’s one of her favorites for novices, which can be used for any yoga pose in which the student’s arms extend overhead.
 Hands: For poses with “starfish” hands on the ground (with fingers spread wide, such as downward facing dog) gently and firmly place your hands over the student’s hands. At the same time, verbally remind her to spread her fingers wide and press her entire hand into the floor.


