The fascial system is a vast network of webbing that connects the entire body. The fascia, which can look similar to a honeycomb or web, is a gelatin matrix of cells containing soft or hard collagen fibers. The density is dependent upon location and function. The nervous system and fascia are intricately connected and share the communicative environment for our cells.
The fascial system needs to be pliable and hydrated for healthy movement. Strain, tension, trauma and injury are passed through the fascial lines. When injury stress or trauma occurs, the fascia hardens and blocks oxygen and nutrient flow to the injured site. This can occur around a joint or organ and, when left long-term, can cause restrictions and misalignment in the body.
Researcher Thomas Myers believes the fascia’s interwebbing is responsible for the tensile strength that supports and holds the body. As a result, the fascia keeps the body upright. Myers’ research explains why movement is three dimensional in nature and his cadaver explorations show direct fascial connections between bone and bone, bone and muscles, and muscles and muscles.
Yoga is a form of exercise that includes deep breathing, awareness and lengthening of the skeletal muscle. Yoga is implemented for therapeutic purposes including stress and pain management. In order to engage the fascia, this system must be lengthened. Yoga coupled with deep breathing benefits stiff and sedentary bodies and a healthy fascial system.
5 Yoga Poses for Myofascial Release
Yoga integrates a balance between engaging and lengthening muscles, which allows a person to be “wakeful,” aware and tuned into his or her physiology during the practice. However, specific yoga asanas lengthen various myofasical lines with a deep breath. Yin yoga is a popular style of yoga in which gentle positions are held for several minutes with the use of props. It is ideal to hold postures for at least 60 to 90 seconds or until heat is felt is the areas that are opening. The following yoga asanas will benefit myofascial release stretching, which is a form of soft tissue therapy that releases pain and increases mobility.These yoga poses for myofascial release will stretch and naturally lengthen the myofascial lines. Myofascial stretching works best when poses are held 90 to 120 seconds.
Superficial Back Line – Downward Facing Dog
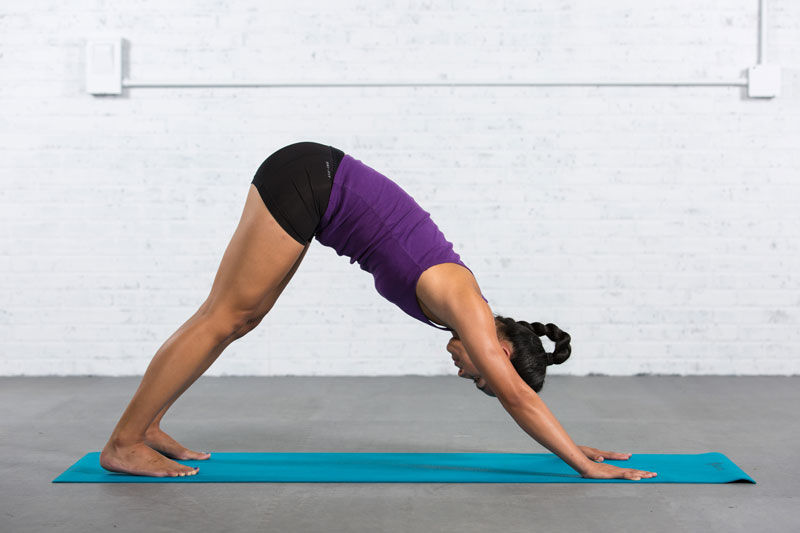
The superficial back line (SBL) runs from the bottom of the toes, around the heels, up the backside of the body and terminates at the frontal ridge of the eyebrows. The SBL keeps the body in a standing position and functions in movement to extend the hip and spine and to flex the knee and ankle. Downward-facing dog helps lengthen this line.
How to Perform: Assume an all-fours position, with the hands shoulder-width and the knees hip-distance apart. Curl the toes underneath and lift the hips into the air. Relax the heels, chest, head and jaw. Roll the shoulders away from the ears and press the palms flat into the mat.
Superficial Front Line – Camel Pose
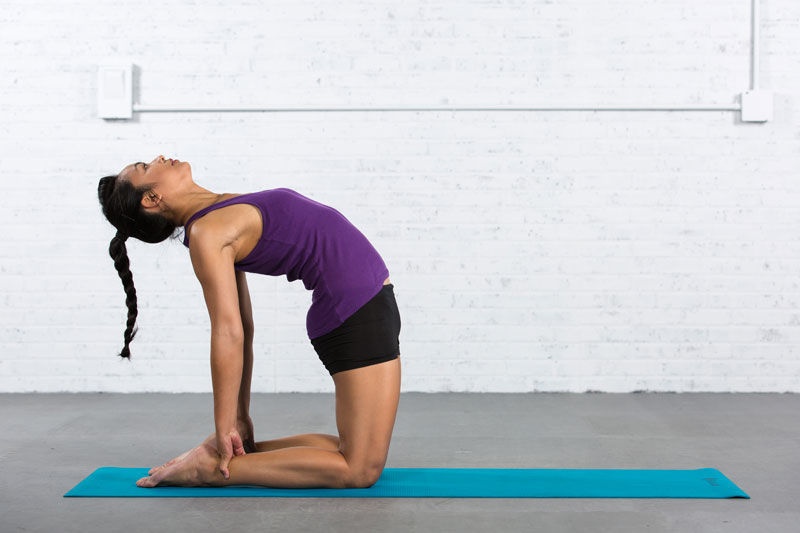
The superficial front line (SFL) includes both sides of the body and connects the tops of the feet to the skull. Muscles include anterior areas of the shins, quadriceps, rectus abdominus, sternal fascia and the sternocleidomastoideus muscle, as well as the skull’s galea aponeurotica. The SFL runs in two sections from toes to pelvis and pelvis to head. The SFL in movement flexes the trunk and hips, knee extension and dorsiflexion. It also supports the skeletal regions that extend forward from the line of gravity including the ribcage, pelvis and head. The camel pose supports the lengthening between the quadriceps and the jawline.
How to Perform: Sit tall on the shins, which should be positioned hip-distance apart. Place the hands on the back of the pelvis. Imagine the thighbones moving forward first, and then the pelvis moving forward. Arch the back and lift the ribcage upward. If possible, reach the hands toward the calves or ankles. Roll the shoulders away from the ears and lift the chin upward, allowing the jaw and head to relax.
Lateral Line – Extended Side Angle Pose
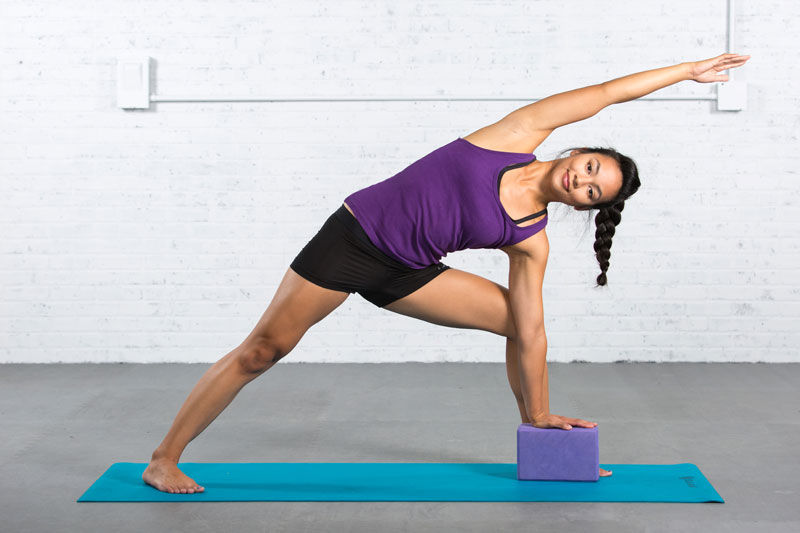
The lateral line (LL) travels up each side of the body from the medial and lateral midpoints of the foot, around the fibular malleolus, and up the lateral leg and trunk to the skull’s mastoid process. In movement, the LL creates lateral flexion and functions as a “brake” to lateral and rotational movements. Side-angle pose is a position that deeply lengthens the side of the body and leg.
How to Perform: Stand with feet 3.5 to 4 feet apart. Turn the right toes forward and kick the left heel out at a 45-degree angle. Lift the arms to shoulder height and bend the right knee to 90 degrees. Reach the right arm to the floor or a block, parallel to the shin. Reach the left arm forward, bringing the biceps above the ear.
Superficial Arm Front Line – Seated Gate Pose
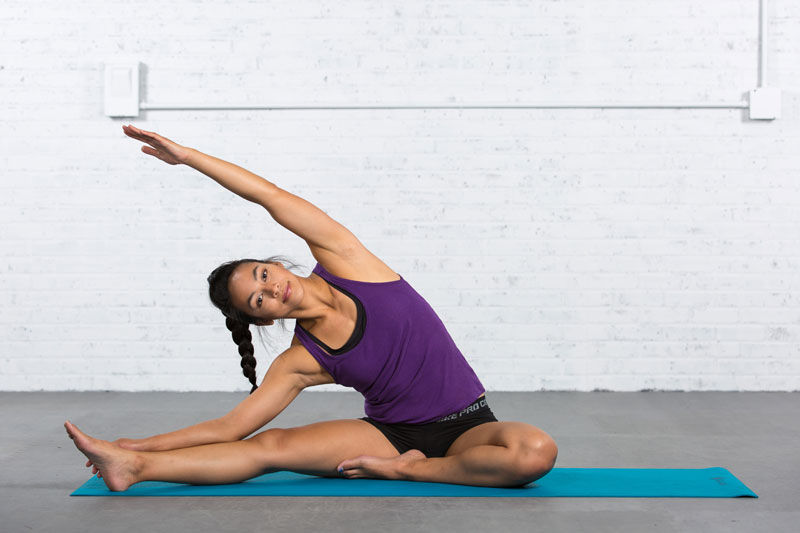
The superficial front arm line initiates at the sternum, clavicle and rib cage at the origins of the pectoralis major. It runs through the biceps groove, including the insertion point of the latissimus dorsi and medial biciptal groove. It connects through the medial intermuscular septum, along the humerus and carpel tunnel, and through the insertion of the palmar surface of the fingers.
How to Perform: Sit on the floor and extend both legs into a “V” position. Place the right foot into the left inner thigh. Slide the left arm along the left leg and anchor the hand on the calf or foot. Keep the chest forward and reach the right hand over the right shoulder. Slightly retract the scapulars and lift the chest slightly to feel a stretch from the chest to the palms.
Spiral Line – Single-leg Revolved Belly Pose
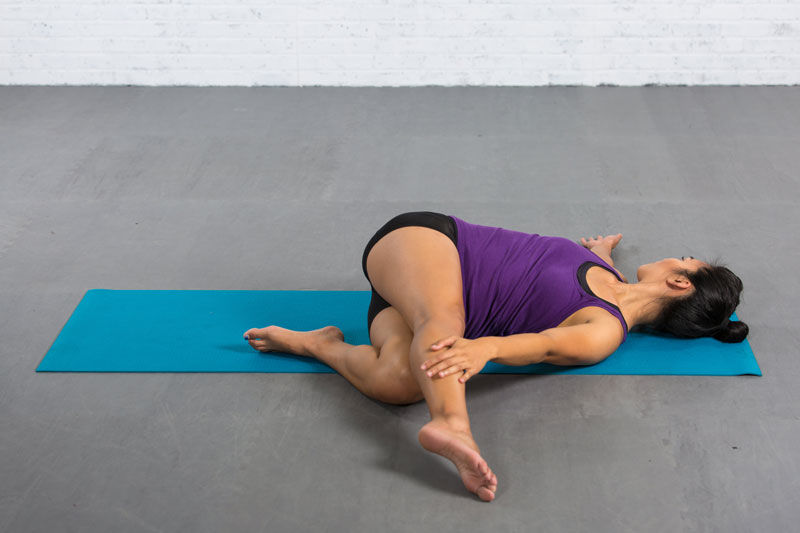
The complex spiral line (SL) contains three cardinal lines. It loops around the trunk in a helix with another loop in the legs, from the hip to the arch and back again. The SL joins on the side of the skull, across the back’s midline to the opposite shoulder, across the anterior torso to the same side of the hip, knee and arch, and returns up the back to the head. The SL creates and facilitates spiral rotations and compensates for deeper rotations in the spine and pelvic core. The single-leg revolved belly pose increases the depth of a spinal twist while lengthening the lateral leg.
How to Perform: Lie face up on the ground and place the feet on the floor. Lower the knees to the left and extend the top (right) leg. With the left hand, reach for the knee or foot to hold. Position the right arm on the floor, level with the shoulder. Use a yoga strap to assist and deepen the pose, if desired.


 by
by 




 by
by