Over the course a lifetime, exercise enthusiasts will experience dozens of different ways in which they can move their bodies. Trends, fads, hobbies and the like lead us to constantly try new and different movements we can use to challenge our strength, mobility and stamina. A few exercises, however, have withstood the test of time due to their simplicity and effectiveness, and every fitness enthusiast should have a working knowledge of these “classics.”
Of course, context is everything when it comes to naming a classic. From an exercise standpoint, classics could be thought of as “fundamental” or “foundational.” Whether the goal is to improve flexibility, strength or overall fitness and stamina, some version or adaptation of these exercises is usually part of the equation.
While health and fitness professionals can (and will) argue endlessly about the “best” exercise, learning how to do the following two classic foundational exercises builds a foundation to get fit, strong and flexible for life.
Classic #1: The Push-up
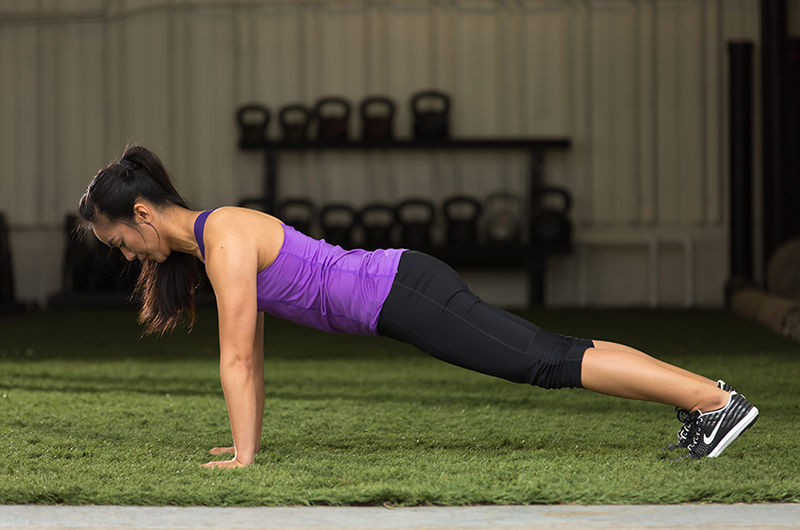
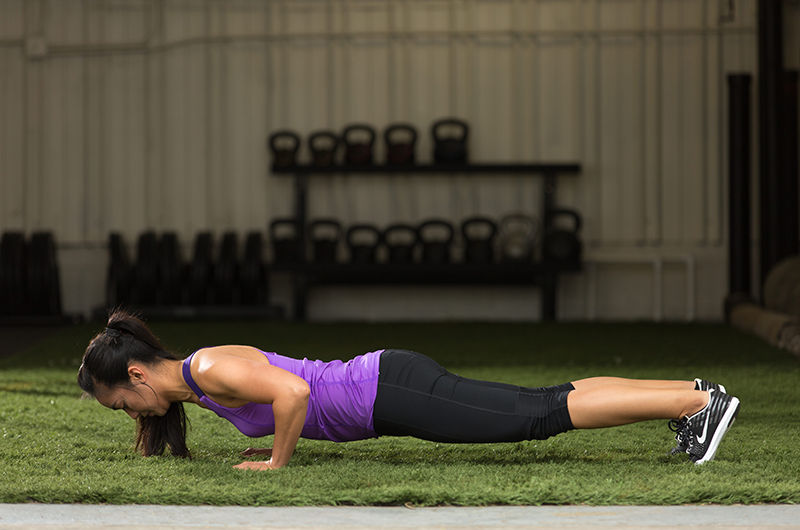
Why is it a classic?
Push-ups require the entire body to work together as a unit as the muscles of the front of the torso (chest and shoulders) and the back of the arms (triceps) move the body toward and away from the ground.
As the entire body is suspended against gravity, nearly every muscle is involved in keeping the core, legs and even the head from crashing to the ground. When you are able to hold your entire structure together as a unit while you move your mass using the muscles of your upper body, you have a terrific foundation not only from which to learn new exercises, but to be strong for day-to-day activities.
What do you need to know about it?
Contrary to many of our experiences with PE teachers and coaches, there’s more to learning how to do the push up than merely “Drop and give me 20!”
The next time you do a push-up, go through this whole-body checklist:
Start: Begin in an all-fours position with the shoulders over the hands and the hips over the knees. Your head should be in front of your fingers. Slowly straighten the knees until your entire body (except for the hands and feet) is suspended completely parallel to the ground.
Head and Neck: Throughout the movement, keep your head and neck in a position as if holding a tennis ball under the chin.
Shoulders: Your shoulders should be at a slightly greater angle than 45 degrees, but less than 90 degrees to the body. Your shoulders should not elevate toward the ears as the body is lowered. The shoulder blades should move toward one another as your chest approaches the ground and stay fairly neutral on the way up. Throughout the movement, the shoulders should not fall back behind or pitch forward over the hands.
Hands: Your hands should be open and intensely gripping the ground, particularly on the way up. On the way down, they should be gripping the ground as if “pulling” the body down.
Hips: All of the muscles of the hips and torso should be intensely rigid, as if performing a whole-body plank exercise. The hips should be in line with the spine and parallel to the ground without visibly elevating or depressing.
Knees: The knees should not be bent at all, as the quads and glutes should squeeze tightly throughout the entire movement.
Feet and Ankles: The feet and ankles should be completely perpendicular to the floor without falling to either side throughout the movement.
Breathing: Your breath should be brought in through the front, back and sides of the lower abdomen while you are moving toward the ground. At the bottom of the push-up, your breath should be exhaled under pressure as the body rises.
Classic #2: The Hip Hinge
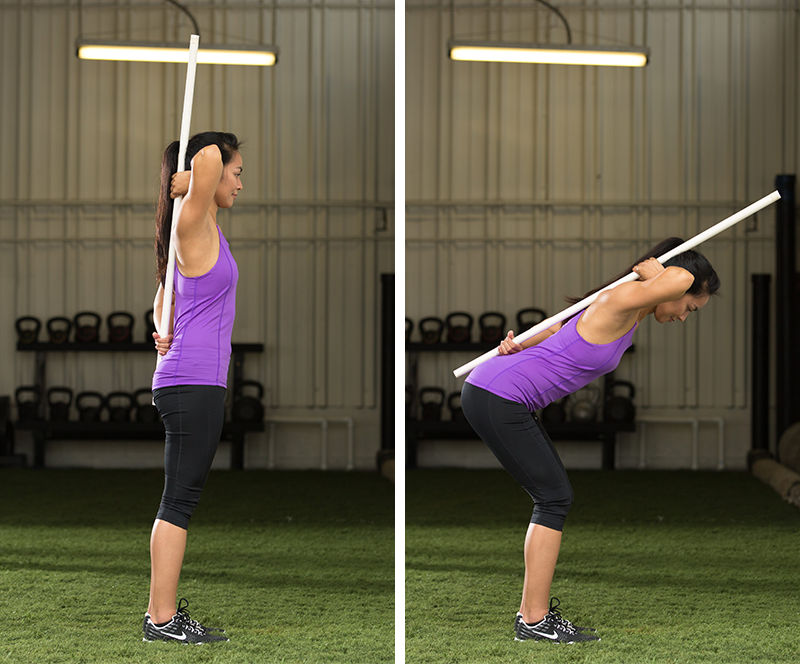
Why is it a classic?
If you need to move your torso closer to the floor (to pick something up or move under something, for example), your body has two strategies:
- Bend the knees
- “Hinge” at the hips
Most of the time, however, you’ll employ a combination of the two.
Primary hip-hinge exercises, such as the deadlift, use the hinging of the hips in conjunction with the muscles of the upper body to pull a weight off of the floor.
When you use your hips as a hinge, you are able to employ the large muscles of the glutes, hamstrings and even the upper and lower back. These posterior muscles get extremely weak when you sit at a desk, or in planes, trains or automobiles. Unfortunately, this is where many of us spend a majority of our time. When these muscles are weakened, it becomes difficult to maintain an upright posture. The result is a whole bevy of aches, pains and injuries.
When you are able to hinge your hips correctly, you strengthen these important posture muscles and fight the damage done by a chair-bound lifestyle. The hip hinge is also an important component of other exercise, sports and life activities.
Furthermore, hip-hinge exercises such as the deadlift and kettlebell swing recruit large amounts of muscle, which is great for building muscle and burning fat.
What do you need to know about it?
Go through this whole-body checklist to learn how to perform a hip hinge properly:
Start: You’ll need a dowel that is about 3 feet long (a broom handle works well). Align it with your spine, gripping it with one hand up behind the neck and one hand at the lower-back area. If the stick is longer than the spine, do not let the remainder of the length go below the tailbone. The back of your head, the area between the shoulder blades and the tailbone should remain in contact with the dowel through the entire movement. Secure this position by holding the dowel to these points with both hands.
Press your back against a wall and step one foot-length away from the wall. At this distance, place your feet at shoulder-width distance apart. Begin with the knees slightly bent, but don’t let them bend any further during the movement. Move the hips backward toward the wall and the torso toward the floor, keeping all the above-mentioned points of contact with the dowel. Keep the hips moving backward until they contact the wall, and keep the torso moving downward until it either reaches parallel to the ground or you begin to lose contact with the dowel at your head, the area between your shoulder blades or the tailbone.
Once this point is reached, keeping all points of contact, return to the upright position.
Head and Neck: Keep your head in contact with the dowel throughout the entire movement.
Shoulders: Keep the shoulders down and back; don’t let them elevate toward the ears as the torso moves toward the floor.
Hands: Use the hands to secure the dowel against your head, the area between the shoulder blades and the tailbone. The hands must also feel any loss of contact, and the movement must be stopped at this point.
Hips: The hips should move backward toward the wall, while you maintain the natural curve of the lower back.
Knees: The knees should remain at a slight bend, but not continue to bend during the movement. They should straighten, but not lock at the top of the movement.
Feet and Ankles: Your body weight should be felt toward the midfoot and heel, with no weight moving forward to the toes.
Breathing: Your breath should be brought in through the front, back and sides of the lower abdomen while moving the torso toward the floor. When the bottom of the movement is reached and the torso begins to move upward once again, your breath should be released under tension.
These two classic exercises are by no means the only foundational, time-tested standards in the world of exercise. The list could go on. Odds are, however, it doesn’t need to. Begin by mastering these two oldies but goodies, and watch your strength, fitness and flexibility skyrocket while you avoid injuries.


 by
by 


 by
by